Path Configuration
Learn how to configure your domain paths to tweak, control, and protect how your medias are delivered.
Upon creating your account, your very own TwicPics domain is available. All your image interactions will now be made through it, and you can attach as many image sources as you want using our powerful path system. This way, you can serve assets stored in multiple locations, such as CMS, DAM, cloud buckets, etc., all through a unique TwicPics domain.
To edit an existing path, click the three dots icon at the right of the path description in the domain paths listing.

Basic Setup
Creating a path in TwicPics involves providing two key pieces of information for each path you wish to establish:
- Path Name: A unique identifier for the path. This name is used to reference and retrieve your assets through TwicPics (i.e.,
https://<twicpics-domain-name>/<path-name>) - Source URL: The HTTP-accessible URL where your assets are stored. TwicPics will fetch and deliver assets from this source.
Source Authentication
If your source URL is publicly accessible, no further configuration is required. However, if your source requires authentication, TwicPics supports several authentication methods to ensure secure access to your assets:
- Basic HTTP Authentication: Utilizes a username and password to provide access. Ensure your source supports this method and you have the necessary credentials.
- Bearer Tokens: Ideal for APIs or services that require a token for authentication. Provide the token generated by your service.
- AWS Signature V4: Compatible with S3 and all S3-compatible services (e.g., Google Cloud, Scaleway, Cloudflare). This method signs requests with your credentials for secure access.
- Azure SAS: For Azure storage, Shared Access Signatures (SAS) provide secure, fine-grained access control to your assets.
- Akeneo PIM (on-demand): Specialized for Akeneo PIM sources. Contact TwicPics support to set up this method.
X-TwicPics-Token
header that is unique to your domain.
Advanced Path Options
Options are listed here in alphabetical order.
Canonical Link Header
For better SEO, it is recommended to have all variants of the same image reference a single master link.
TwicPics can generate the header with this "canonical link" for you automatically.
Two options are available:
TwicPics URL: the canonical link points to your image through this path, ensuring eventual default manipulation and overlay are applied. Your Source URL is protected: search engines will reference your TwicPics URL.Source URL: the canonical link points to your Source URL. Default manipulation and overlay will not be applied. Your Source URL is made public: search engines will reference your Source URL.
Default Manipulation
For each path, you can set a default manipulation. This is especially handy in order to protect your assets from web crawlers and to avoid ever distributing the full-resolution master image.
Let us say that the root path (/) of <sub>.twic.pics has its default manipulation set to max=1000.
This default manipulation will be applied after any manipulation provided using the TwicPics API.
Let us see what we get with a few examples:
| API Call | Final manipulation |
|---|---|
https://<sub>.twic.pics/image.jpg | max=1000 |
https://<sub>.twic.pics/image.jpg?twic=v1/cover=1:1 | cover=1:1/max=1000 |
https://<sub>.twic.pics/image.jpg?twic=v1/resize=2000/quality=60 | resize=2000/quality=60/max=1000 |
Please note that, in this example and no matter what, TwicPics will always deliver an image that is at most 1000 pixels wide.
You could also use the default manipulation to ensure a minimum image quality, no matter the network conditions of the end-user. For instance, quality-min=50 would ensure no image with a quality lower than 50 would be delivered, even to users on 2G networks.
In truth, any transformation can be used, and the possibilities are virtually endless.
Another neat trick is adding transformations before and/or after the ones provided through the API.
By placing the star symbol (*) in place of a transformation, you indicate where the manipulation provided through the API has to be placed.
Let us say, for instance, that you wish to provide a default quality of 50 while making it possible to override the value through the API. The correct manipulation for this would be quality=50/*.
Here is how it would behave in several examples:
| API Call | Final manipulation |
|---|---|
https://<sub>.twic.pics/image.jpg | quality=50 |
https://<sub>.twic.pics/image.jpg?twic=v1/cover=1:1 | quality=50/cover=1:1 |
https://<sub>.twic.pics/image.jpg?twic=v1/resize=2000/quality=60 | quality=50/resize=2000/quality=60 |
Please note that while the first two resulting images will have a quality of 50, the third one will have a quality of 60 as specified through the API.
Of course, it is possible to create a default manipulation that will act before and after the one provided through the API.
For instance, we could combine a default quality with a maximum width by setting the default manipulation to quality=50/*/max=1000.
How will our previous examples behave in such an instance?
| API Call | Final manipulation |
|---|---|
https://<sub>.twic.pics/image.jpg | quality=50/max=1000 |
https://<sub>.twic.pics/image.jpg?twic=v1/cover=1:1 | quality=50/cover=1:1/max=1000 |
https://<sub>.twic.pics/image.jpg?twic=v1/resize=2000/quality=60 | quality=50/resize=2000/quality=60/max=1000 |
This is a resounding success! No matter what the manipulation provided through the API is, we do have a default, overridable quality of 50, and no image more than 1000 pixels wide will be delivered.
One final note: since TwicPics Components and TwicPics Native issue API requests under the hood, They will respect default manipulations too.
Let us assume we have the same default manipulation as in the previous example (quality=50/*/max=1000) and let us consider the following element
<img data-twic-src="image:man.jpg" />
Let us also assume this element is styled so that its width ends up being 2000 pixels. The manipulation applied to image:man.jpg will be resize=2000 but, since we have a default manipulation quality=50/*/max=1000, the actual final manipulation will be quality=50/resize=2000/max=1000. So the image quality will be 50 and its width 1000, as expected.
Image Fallback URL
This fallback image will be used if and when a 4xx status code (400, 404, etc) is issued by your server.
Consider the following path configuration for <sub>.twic.pics:
| path | source URL |
|---|---|
/ | https://www.my-company.com/ |
and say you have set the fallback of / to https://www.my-company.com/fallback.jpg.
At one point, you end up requesting https://<sub>.twic.pics/ilage.jpg instead of https://<sub>.twic.pics/image.jpg. TwicPics will try and request https://www.my-company.com/ilage.jpg, get a 404 in return, and thus, switch to https://www.my-company.com/fallback.jpg.
Eventual transformations will be applied to the fallback as if it were the intended target. So https://<sub>.twic.pics/ilage.jpg?twic=v1/resize=300 will return a 300 pixels wide version of https://www.my-company.com/fallback.jpg.
If, for whatever reason, requesting the fallback results in a 4xx status code, then this status code will be propagated back to the requester.
If no fallback is provided, TwicPics will simply propagate the original 4xx status code.
Mask
The mask feature introduces an advanced capability for users to create complex image compositions through the use of mask layers. This feature allows for dynamic and creative control over the visibility of different parts of an image, enabling the creation of intricate visual effects and compositions.
What is a Mask Layer?
A mask layer is a tool used in digital image processing to determine which parts of an image should be visible or transparent. In essence, it's like a stencil over your image. The mask layer itself is an image (either a Scalable Vector Graphics (SVG) file or a bitmap image) where black and white indicate the visibility of the corresponding parts of the source image.
- White areas in the mask layer indicate 100% visibility. These areas of your image will be fully visible.
- Black areas represent 100% transparency. These parts of your source image will be completely transparent, creating openings in the image.
Using the Mask Feature
To use the mask feature, you'll need to provide the URL of an image that will serve as the mask layer. This can be either a SVG or a bitmap image. TwicPics will then apply this mask to all images or videos delivered through this path, following the rules of visibility and transparency defined by the mask's colors.

Metadata
By default, TwicPics will filter out any metadata from your source asset to gain precious bytes.
However, if your images contain information you need or want to still be present in the transformed image (like a copyright notice for instance), you can switch the Keep metadata button on.
Overlay
With the overlay feature, you can create a dynamic composition or add a watermark for all images or videos requested through the path.
You then have to provide the URL of the overlay image, and several options are available for:
- where the overlay is positioned in the images or videos:
Anchor - how the overlay is sized and if it is repeated:
Mode - how opaque the overlay has to be:
Opacity - How the overlay is scaled relative to the size determined by the given mode:
Scale
Tweaking and testing overlaying can be a bit cumbersome: it can take several minutes for the configuration to be propagated to the TwicPics servers, and our CDN will retain any transformed image or video for at least thirty minutes and up to five days.
As such, we recommend you use an unused path (i.e., one not in production) to test overlaying. We also recommend relying on an incrementing URL parameter to ensure you do not hit the CDN cache.
Once you are satisfied with overlaying on your test path, simply apply the exact same configuration to your production path.
Anchor
The Anchor option determines where the overlay is positioned in the image or video.
Available values are:
center, top, bottom, left, right, top-left, top-right, bottom-left, bottom-right
Mode
Mode determines how the overlay should be resized and/or repeated relative to the image or video. All modes take the Anchor into account for initial positioning.
Available modes are:
| Mode | Description |
|---|---|
| stretch | The overlay is sized to fill the image. The overlay will completely fill the image. If the overlay's aspect ratio does not match the aspect ratio of its box, then the overlay will be stretched to fit. |
| contain | The overlay is scaled to maintain its aspect ratio while fitting within the image. The overlay is made to fill the box, while preserving its aspect ratio, so the object will be "letterboxed" if its aspect ratio does not match the aspect ratio of the box. |
| cover | The overlay is sized to maintain its aspect ratio while filling the image. If the overlay's aspect ratio does not match the aspect ratio of the image, then the overlay will be clipped to fit. |
| fill | The overlay is fully contained in the image and repeated if needed. |
Opacity
Opacity determines how opaque the overlay should be. It is a number between 0 (invisible) and 1 (fully opaque).
Scale
Scale is a number specifying a scale factor to make the overlay scale by the same factor along both the X and Y axes. This scale factor is relative to the size determined by the given mode. For example, an half the image size overlay is produced using a scale factor of 0.5 with the contain mode.
URL
URL specifies the location of the overlay image.
TwicPics will accept the usual, non-animated, formats: AVIF, GIF, HEIF, JPEG, PNG, and WebP with the notable addition of SVG.
In case of an overlay with no transparency, be sure to use Opacity unless you want the original image or video to disappear and be replaced with the overlay itself!
Examples
In the following examples, we use the Overlay feature to process watermarked images. In this case, the overlay is an SVG file.
| Setup | Result |
|---|---|
anchor=centermode=stretchopacity=1scale=1 |  |
anchor=centermode=containopacity=1scale=1 |  |
anchor=centermode=coveropacity=1scale=1 |  |
anchor=centermode=fillopacity=1scale=1 |  |
anchor=centermode=containopacity=1scale=0.33 | 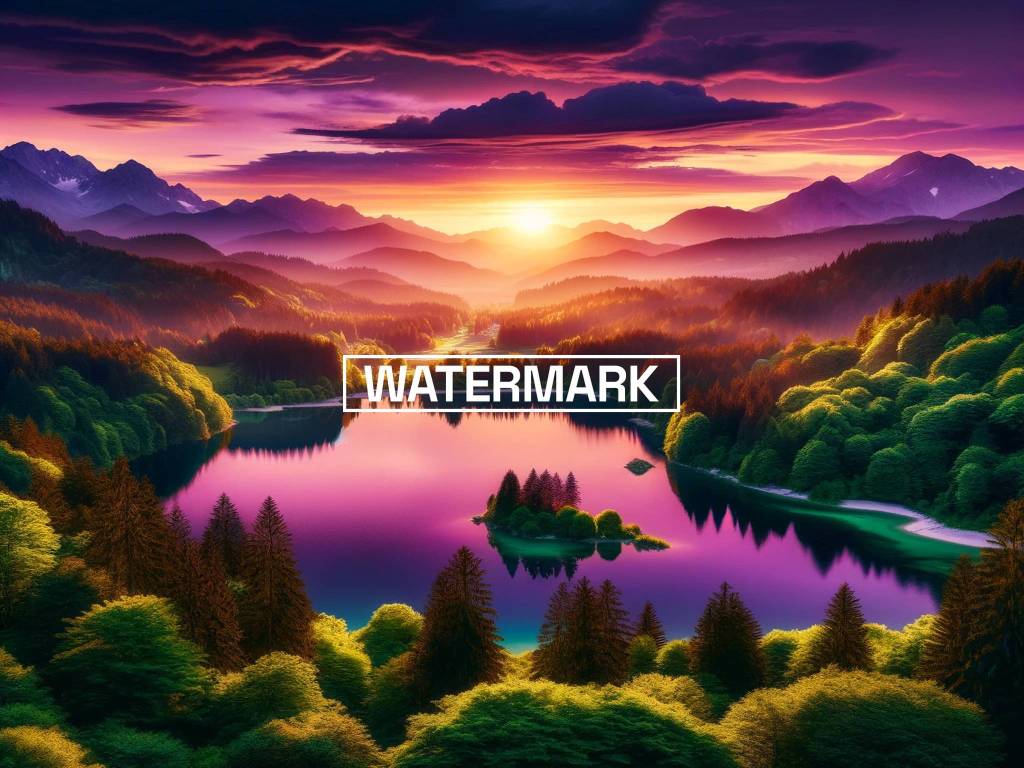 |
anchor=centermode=containopacity=0.5scale=0.5 |  |
anchor=bottom-rightmode=containopacity=1scale=0.33 |  |
Passthrough
By default, TwicPics will deliver images and videos. In the case where an unsupported media type (PDFs, CSS files, JavaScript, etc) is encountered, a standard HTTP 415 error response will be returned.
You can change this paradigm by switching the Passthrough button on. TwicPics will then act as a standard content delivery network (CDN) and deliver, in addition to optimized images and videos, any type of unsupported asset without applying them any transformation.
Passthrough Use Cases
Passthrough is particularly useful if you need to utilize TwicPics paths to deliver assets other than images and videos. It ensures seamless delivery of diverse media types through the TwicPics CDN.
Passthrough Best Practices
Passthrough should be used judiciously. It is intended as a solution for scenarios where there is no alternative to using TwicPics paths for asset delivery. You are encouraged to evaluate your needs and activate Passthrough only when necessary to optimize cost and performance.
Referrer filter
The Referrer Filter feature enhances security and control over who can access your assets. By specifying a list of domains, you can restrict incoming requests based on the Referer header, ensuring that only authorized sources are able to retrieve content.
How Referrer filter works?
When a request is made, TwicPics examines the Referer header. If the domain making the request matches one of the user-defined domains in the filter list, the request is allowed. If not, a 403 Forbidden response is issued, blocking access to the resource.
Configuring Your Referrer Filter
To use the Referrer Filter, provide a list of domains you wish to allow. There are three ways to specify domains:
- Root (Apex) Domain: Specify the root domain to accept requests only from the root domain itself. For example,
domain.comwill permit requests from domain.com but not from any subdomains likewww.domain.com. - Specific Subdomain: Specify a full subdomain to restrict access to that particular subdomain. For instance,
www.domain.comwill allow requests fromwww.domain.comonly, excluding any other subdomains or the root domain. - Wildcard Subdomains: Use
*to denote wildcard subdomains, allowing requests from any subdomain of the specified domain. For example,*.domain.comwill enable requests fromwww.domain.com,images.domain.com, and any other subdomains.
Handling Unauthorized Access
If a request does not meet the criteria specified in your Referrer Filter, TwicPics will return a 403 Forbidden response. This ensures that only requests from authorized domains can access your resources.
Referrer Filter Best Practices
- Review your domain list regularly to ensure it reflects your current access control needs.
- Be specific in your domain choices to minimize the risk of unauthorized access.
- Test your configuration thoroughly to prevent accidental blocks or exposure.
Source Request Headers
For each path, you can set a list of headers to be sent to your server.
This is especially handy in order to set up any custom header that would be checked by your server.
Upscale
This feature allows for the upscaling of images and videos to meet the demanding requirements of various platforms and devices, ensuring your content always fits. Once enabled, it permits TwicPics to upscale your source assets to a higher resolution upon request.
How upscaling works?
By default (Upscale turned off), TwicPics will prevent upscaling and limit renditions to the maximum size of the source asset.
When the Upscale feature is active, and a request is made for a rendition larger than the source asset's original dimensions, TwicPics will upscale the asset to match the requested size. For instance, if your source image or video is 1000 pixels in width and you request a rendition of 2000 pixels, TwicPics will deliver an upscaled version at 2000 pixels.
Catch-All Path Segments
Using the character *, you can specify a "catch-all" path segment. What it means is that this section of your TwicPics URL can be anything as long as it does not contain a slash (/).
Using this technique, you can insert meaningful, arbitrary slugs in your TwicPics URL and boost SEO.
For instance, the configuration below:
| path | source images folder |
|---|---|
/* | https://media.my-company.com/web/ |
will enable the mappings below:
| TwicPics URL | source image URL |
|---|---|
https://<sub>.twic.pics/pair-of-shoes/1.png | https://media.my-company.com/web/1.png |
https://<sub>.twic.pics/smart-phone/2.png | https://media.my-company.com/web/2.png |
Catch-all path segments can appear anywhere in your path and as many times as necessary.
For instance, the configuration below:
| path | source images folder |
|---|---|
/sales/* | https://media.my-company.com/web/ |
will enable the mappings below:
| TwicPics URL | source image URL |
|---|---|
https://<sub>.twic.pics/sales/i-phone/1.png | https://media.my-company.com/web/1.png |
https://<sub>.twic.pics/sales/nike-air/2.png | https://media.my-company.com/web/2.png |
When given a choice between a catch-all segment or a more specific one, TwicPics will always favor the most specific one, regardless of the order in which the paths have been created.
For instance, the configuration below:
| path | source images folder |
|---|---|
/* | https://media.my-company.com/web/ |
/specific | https://www.my-company.com/assets/ |
will enable the mappings below:
| TwicPics URL | source image URL |
|---|---|
https://<sub>.twic.pics/unspecific/1.png | https://media.my-company.com/web/1.png |
https://<sub>.twic.pics/specific/2.png | https://www.my-company.com/assets/2.png |
Beware that a catch-all segment will take priority over a path finishing at the same level.
For instance, the configuration below:
| path | source images folder |
|---|---|
/s1/* | https://media.my-company.com/web/ |
/s1 | https://www.my-company.com/assets/ |
will enable the mappings below:
| TwicPics URL | source image URL |
|---|---|
https://<sub>.twic.pics/s1/1.png | https://www.my-company.com/assets/1.png |
https://<sub>.twic.pics/s1/s2/2.png | https://media.my-company.com/web/2.png |
Multiple Sources Paths
Multiple Sources Paths allow you to transform media from any storage through a single, unified path.
Unlike regular paths, Multiple Sources Paths do not reference a Source URL but rather expect the URL of the source image to be provided at the API level.
As such, and to ensure external users cannot use TwicPics on your behalf, these URLs must be encrypted.
How It Works
When creating a Multiple Sources Path, you'll be provided with an Encryption Key.
Let's take the following example:
- A Multiple Sources Path named
multion yourcompany.twic.picsdomain - An image found at
https://example.com/image.png.
Using the Encryption Algorithm described below, you will have to encode https://example.com/image.png into something akin to aHR0cHM6Ly9zb21lLXNpdGUuY29tL3NvbWUtaW1hZ2UucG5n.
The image will be accessible through https://company.twic.pics/multi/aHR0cHM6Ly9zb21lLXNpdGUuY29tL3NvbWUtaW1hZ2UucG5n and can be referenced in the src prop (or data-twic-src attribute if not using components) as image:multi/aHR0cHM6Ly9zb21lLXNpdGUuY29tL3NvbWUtaW1hZ2UucG5n.
You can now apply transformations to the image as you would on a regular path:
https://company.twic.pics/multi/aHR0cHM6Ly9zb21lLXNpdGUuY29tL3NvbWUtaW1hZ2UucG5n?twic=v1/cover=500x500https://company.twic.pics/multi/aHR0cHM6Ly9zb21lLXNpdGUuY29tL3NvbWUtaW1hZ2UucG5n?twic=v1/output=preview
Encryption Algorithm
TwicPics expects the URLs to be encrypted as follows:
- The input URL is reversed (i.e.
https://domain/pathbecomeshtap/niamod//:sptth) - The reversed URL is encrypted using the Advanced Encryption Standard Algorithm with a 128-bit key
- The resulting encrypted string is encoded in Base64
- Finally, all forward slashes are replaced by dashes in the resulting encoded string
The example below implements the encryption algorithm:
Paths Resolution
Using Absolute URLs
Paths can have any format and as such, they can look like absolute URLs.
For instance, the following configuration:
| path | source images folder |
|---|---|
/https://www.my-company.com | https://www.my-company.com/ |
would make it so https://<sub>.twic.pics/https://www.my-company.com/assets/image.png points to https://www.my-company.com/assets/image.png.
Nothing impressive so far but it can come in handy when combined with the TwicPics Native.
Since the TwicPics understands relative URLs in both data-twic-src, data-twic-poster and data-twic-background attributes, you can seamlessly handle assets located on the same server as your webpages.
Let's say https://www.my-company.com/my-page.html contains the following img element:
<img data-twic-src="assets/image.png" />
This will be rightfully understood as https://www.my-company.com/assets/image.png and the image will be optimized by TwicPics automagically.
Conflicting Paths
Paths do not have to be on the same hierarchical level. For instance, the following configuration:
| Domain path | Source URL |
|---|---|
/ | https://www.my-company.com/ |
/media | https://media.my-company.com/ |
would make it so:
https://<sub>.twic.pics/media/logo.pngpoints tohttps://media.my-company.com/logo.pnghttps://<sub>.twic.pics/banner.pngpoints tohttps://www.my-company.com/banner.png
Doing so will make it impossible to access any image inside https://www.my-company.com/media/.
